Introduction
...
Hardware
- DS212j using the Marvel Kirkwood mv6281 ARM chipset
- Two 3 Terabyte Drives
Synology DS212j Setup
...
Perform the following Update
- update firmware
- sync the time server
- disabling cache management (when UPS N/A)
Setup the Volumes
- S.M.A.R.T. test
- enable the home directory for SSH
Install ipkg
Introduction
ipkg is the packaging system for the lightweight debian based linux system provided by Synology.
At a high level, to install ipkg, as root,
- Download and run a script which the community calls a bootstrap file specific to the NAS processor hardware
- Modify .profile to include ipkg in the path
Steps
The following procedure was successful with DSM 4.0-2233.
Determine the processor of your NAS. Look at the Synology wiki to determine what bootstrap that matches the NAS processor hardware.
Not sure why by default the links point to the unstable directory. However, at least for the version used here the bootstrap in unstable and stable are identical.
The special boostrap instructions on the wiki as of May 5, 2012 for DSM 4.0 do not seem complete nor correct. Using DSM 4.0-2233 did not result in errors so ignore these instructions,
NEW: If you have DSM 4.0 there is an additional step. In the file /root/.profile you need to comment out (put a # before) the lines "PATH=/sbin:/bin:/usr/sbin:/usr/bin:/usr/syno/sbin:/usr/syno/bin:/usr/local/sbin:/usr/local/bin" and "export PATH". To do this enter the command "vi /root/.profile" to open the file in vi. Now change vi to edit mode by pressing the "i" key on your keyboard. Use the down cursor key to move the cursor to the start of the line "PATH=/sbin..." and put a "#" infront of this line so it is now "#PATH=/sbin...". Do the same for the line below so it is now "#export PATH". Now press the escape key (to exit edit mode) and type "ZZ" (note they are capitals) to tell vi to save the file and exit. For background info on why this is neccessary for DSM 4 refer to http://forum.synology.com/enu/viewtopic.php?p=185512#p185512
Instead following the bootstrap installation instructions, log in through ssh as root and download the boostrap,
cd /volume1/@tmp
wget http://ipkg.nslu2-linux.org/feeds/optware/cs08q1armel/cross/unstable/syno-mvkw-bootstrap_1.2-7_arm.xsh
Make sure to download the boostrap that matches the NAS processor hardware!
Run the installer,
DiskStation> chmod +x syno-mvkw-bootstrap_1.2-7_arm.xsh
DiskStation> ./syno-mvkw-bootstrap_1.2-7_arm.xsh
Optware Bootstrap for syno-mvkw.
Extracting archive... please wait
bootstrap/
bootstrap/bootstrap.sh
bootstrap/ipkg-opt.ipk
bootstrap/ipkg.sh
bootstrap/optware-bootstrap.ipk
bootstrap/wget.ipk
1232+1 records in
1232+1 records out
Creating temporary ipkg repository...
Installing optware-bootstrap package...
Unpacking optware-bootstrap.ipk...Done.
Configuring optware-bootstrap.ipk...Modifying /etc/rc.local
Done.
Installing ipkg...
Unpacking ipkg-opt.ipk...Done.
Configuring ipkg-opt.ipk...WARNING: can't open config file: /usr/syno/ssl/openssl.cnf
Done.
Removing temporary ipkg repository...
Installing wget...
Installing wget (1.12-2) to root...
Configuring wget
Successfully terminated.
Creating /opt/etc/ipkg/cross-feed.conf...
Setup complete.
BusyBox v1.16.1 (2012-06-06 04:34:01 CST) built-in shell (ash)
Enter 'help' for a list of built-in commands.
DiskStation> view /usr/syno/ssl/openssl.cnf
/bin/sh: view: not found

# Note it looks like the the openssl.cnf WARNING is normal.
Edit the root account's .profile file and ensure the /opt/bin is located at the beginning of the path.
vi ~/.profile
You final bash should look like this,
umask 022

PATH=/opt/bin:/sbin:/bin:/usr/sbin:/usr/bin:/usr/syno/sbin:/usr/syno/bin:/usr/local/sbin:/usr/local/bin
export PATH

#This fixes the backspace when telnetting in.
#if [ "$TERM" != "linux" ]; then
#        stty erase
#fi

HOME=/root
export HOME

TERM=${TERM:-cons25}
export TERM

PAGER=more
export PAGER

PS1="`hostname`> "

alias dir="ls -al"
alias ll="ls -la"
Log out and the terminal and log back in.
Verify ipkg is working and at the same time update the package list,
ipkg update
Downloading http://ipkg.nslu2-linux.org/feeds/optware/cs08q1armel/cross/unstable/Packages.gz
Inflating http://ipkg.nslu2-linux.org/feeds/optware/cs08q1armel/cross/unstable/Packages.gz
Updated list of available packages in /opt/lib/ipkg/lists/cross
Successfully terminated
The ipkg update dialog will show the repository being used. In the above example, load a browser and go to http://ipkg.nslu2-linux.org/feeds/optware/cs08q1armel/cross/unstable/ to see the list of software available for installation.
Scripts
Note that the ash is the default shell. Synergy selected ash because it is a lightweight version of bash and generally compatible.
Connecting with Clients
Mac OS X Auto Mount
To show up on the Mac find SHARED did a variation of this, http://www.iceycake.com/2009/03/tutorial-how-to-auto-mount-afp-share-in-mac-os-x-leopard/ and selected just one folder then all the others show up.
Mac OS X Hidden Mount
To mount a hidden share as a specific user perform the following steps. It is assumed that in DiskStation Mac file service has been enabled.
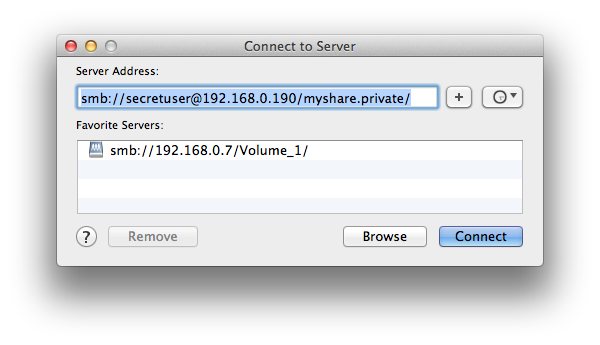
Connect to Server
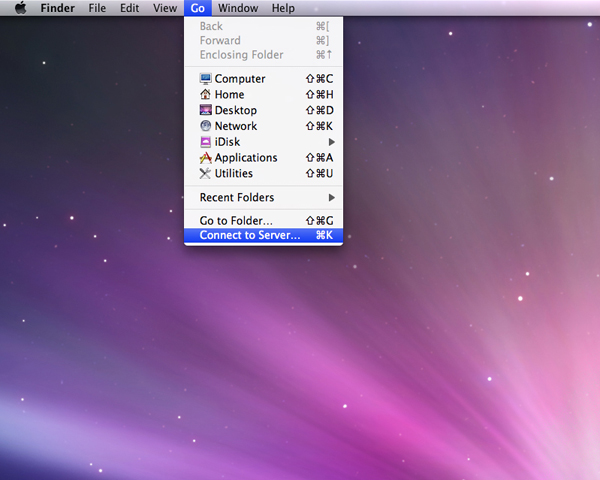
Use the key combination command-k or choose Go > Connect to Server from the menu bar.
Type the following,
smb://secretuser@192.168.0.190/myshare.hidden/
Type Synology DiskStation's IP address or server name proceeded by smb:// or afp://, the id of the user to log in with, the share path and click Connect,
Put here which protocol (smb or afp) is better to use.
According to the Synology website, it is better performance, it is recommended that you connect to the shared folders via SMB.
Enter the user credentials with authentication to access the shared folder. And then click Connect to connect to the shared folder.

Now this network share will not show up in the SHARED listing in the file manager. Instead look for the share in the /Volumes folder. In this example, the